Sun Decking composite boards are designed to make installation straightforward for simple and complex designs.
General installation information
Sun Decking as a composite product is by its nature very different from timber products, and in fact many other composites. If you are installing composite decking it is valuable to make yourself as familiar with the product characteristics before progressing with your installation.
Sun decking CLASSIC™ and ELITE™ are both designed to be used with our hidden clip system and to enable you to install the product with minimal or no direct fixing. It cannot be emphasised enough that the clips options allow for minimal direct fixing if the installation is planned.
With proper consideration when you are installing composite decking then you will have a better designed deck with a faster, hassle-free installation. We will personally discuss your situation and your options for installing at any time to help you to install
Main considerations for installation
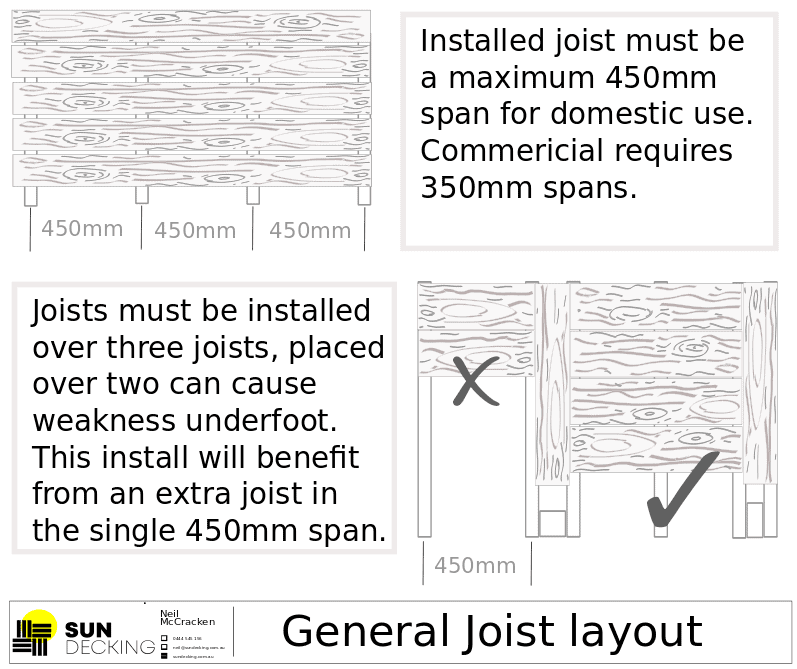
The decking must be installed on and fixed to a substructure, this is not a product that can be laid on concrete or other flooring base. The decking can be installed on both timber and steel structures. The maximum joist span for the CLASSIC™ and ELITE™ is 450mm.
You must assure yourself the substructure is constructed to BCA standardsand is secure for your intended use. We can guide and advise on the general standards for your planning.
The joists must be aligned at the same level, particularly in a replacement deck uneven joists will make the installation much more difficult.
You must take into consideration the thermal expansion and contraction of composite, which is greater than timber. We have included a general guide with examples, and we will happily discuss and clarify this for your individual situation.
As you install then single piece of decking board must be installed over a minimum of three joists.
Composite decking is installed in a different manner to timber, and in designing then keep this in mind – you are not installing timber and the characteristics are different. Composite is much easier than timber installations.
Click image to enlarge
1. Cutting boards
As a product composite is clean and easy to cut, it does not splinter and creates clean edges. It will cut cleanly with a Mitre saw and a standard timber blade of around 80 teeth.
Sun Decking composite boards and about 3 times as dense as a timber, that is one reason it has such advantages. This does mean that on cutting the composite boards then the blade will blunt more quickly than you might expect from timber. Whilst we don’t necessarily test each blade for effectiveness, we have found Makita blades to be really effective with our composites.
Cutting any odd shapes with a jigsaw is possible, again be aware that the blades will wear quickly. It is also possible to route edges on the CLASSIC™ boards should you wish to do this.
2. Expansion gaps on Composite decking
As a product composite is clean and easy to cut, it does not splinter and creates clean edges. It will cut cleanly with a Mitre saw and a standard timber blade of around 80 teeth.
Sun Decking composite boards and about 3 times as dense as a timber, that is one reason it has such advantages. This does mean that on cutting the composite boards then the blade will blunt more quickly than you might expect from timber. Whilst we don’t necessarily test each blade for effectiveness, we have found Makita blades to be really effective with our composites.
Cutting any odd shapes with a jigsaw is possible, again be aware that the blades will wear quickly. It is also possible to route edges on the CLASSIC™ boards should you wish to do this.
Part 1: Click image to enlarge
Part 2: Click image to enlarge
3. General layout and design options
One of the great aspects of composite decking installations is that there are many creative ways in which to install the boards to make a unique and personal style. Board colours can be matched for contrast, highlighting step down or edges, screening can be matched to decking and layouts can be personalised.
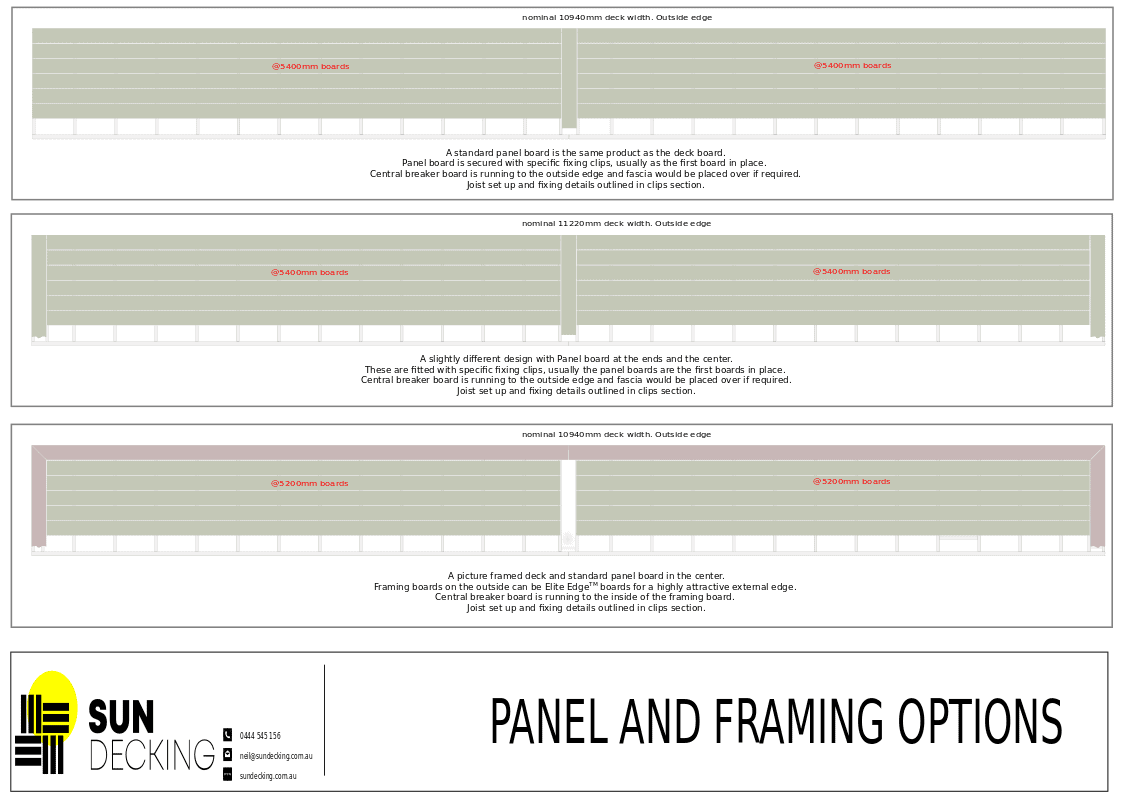
Deck butt joins in particular are usually set up to be a consistent alternate pattern. This both looks much better in the final finish as it allows some ability to minimise waste on the job. The distance between the alternate joins can be minimised by placing joist close together in that part of the deck. An example of this is provided as a base for planning and we can create a design layout for your specific deck if it will help in your project.
It is very common on larger composite decks to insert ‘breaker’ boards to eliminate the use of butt joins. This panel design also allows expansion and contraction to be managed within each created panel. Contrasting colour boards can be used in the design if desired and we hold specific clips to ensure that this can be done with no direct fixing of boards.
Framing boards are used to allow the deck more style and change the finish look. In particular it also allows the ELITE™ Edge board to be installed around all the open deck areas.
For corners there is the option to use a breaker board with 45° cut boards, or a butt join at 45° cuts or designed with boards changing direction.
Part 1: Click image to enlarge
Part 2: Click image to enlarge
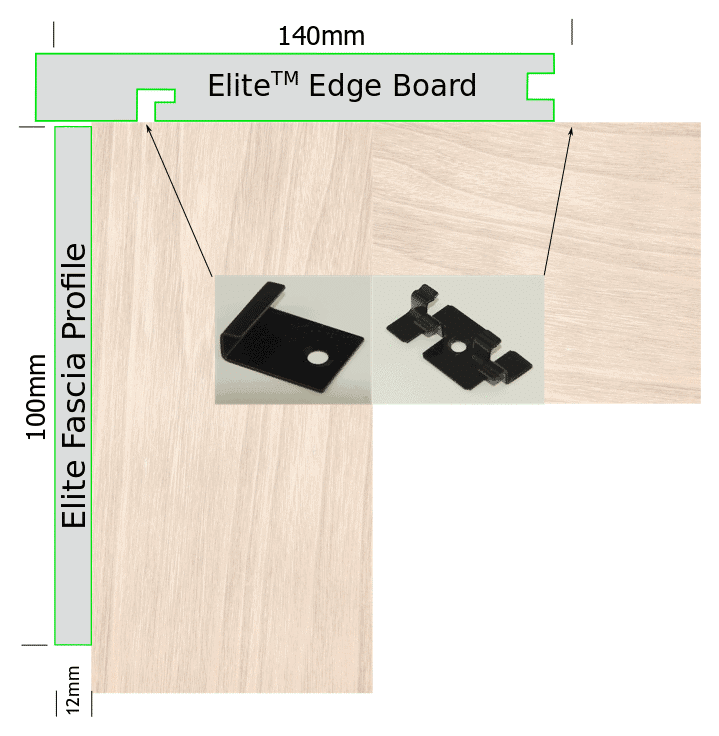
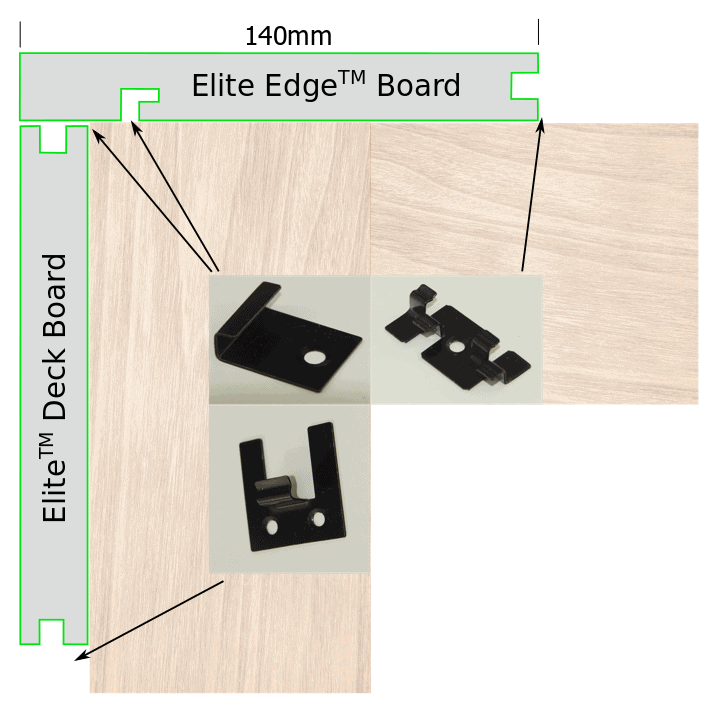
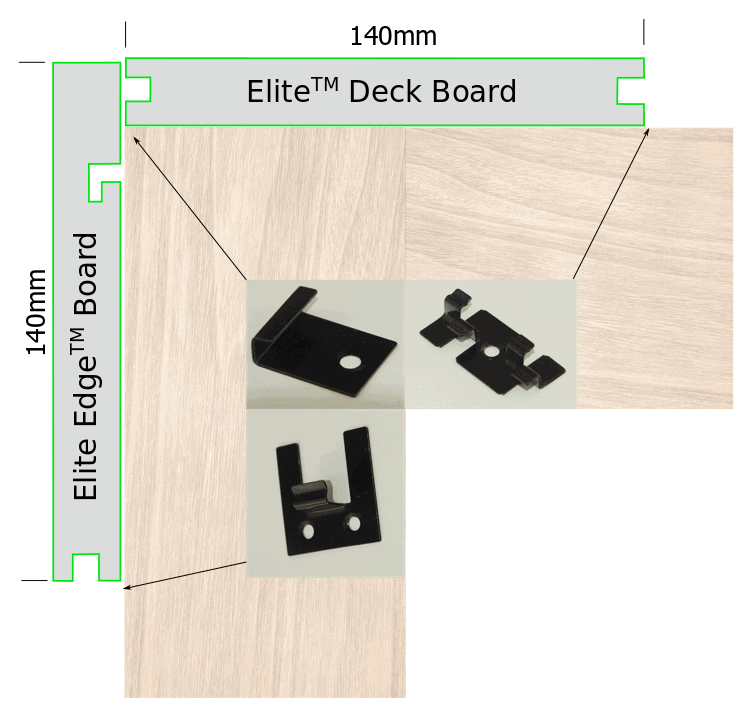
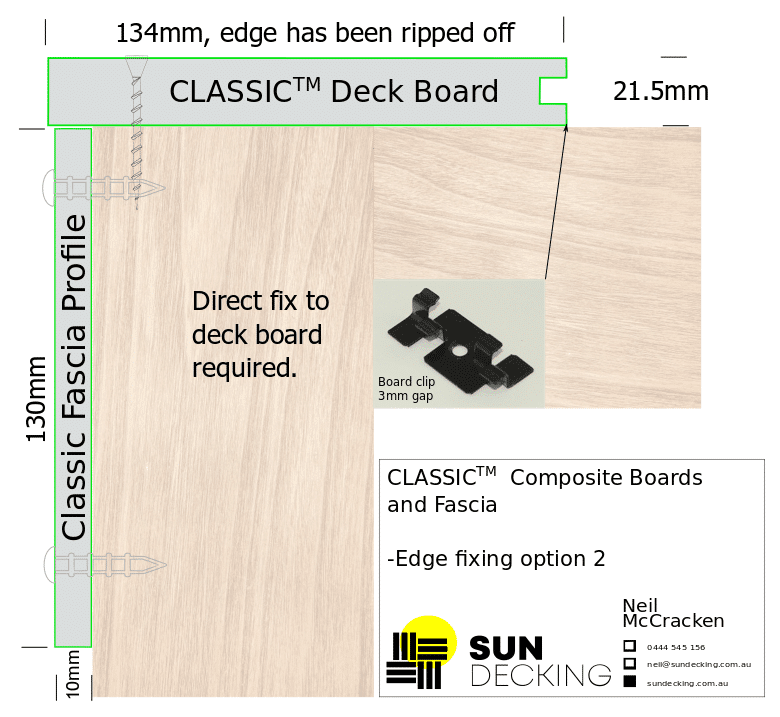
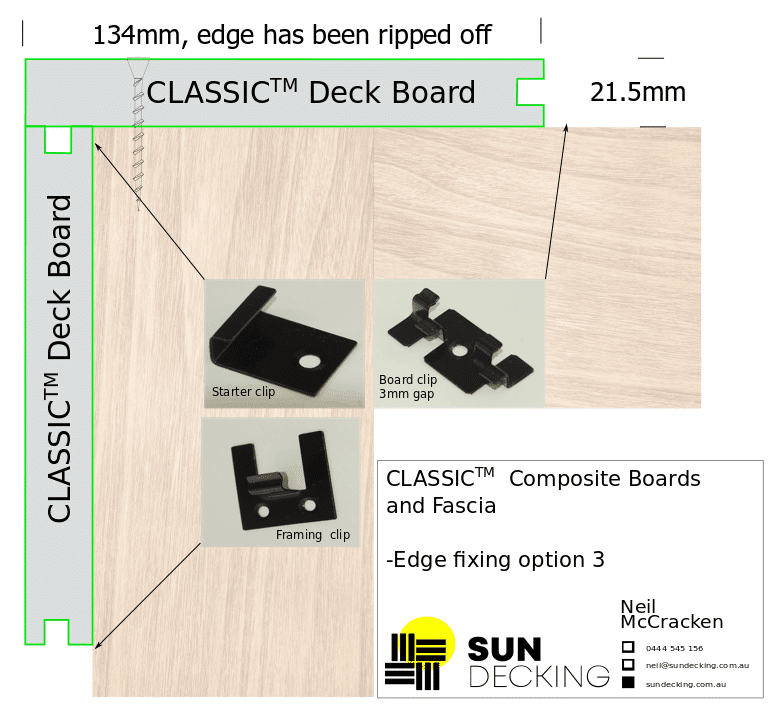
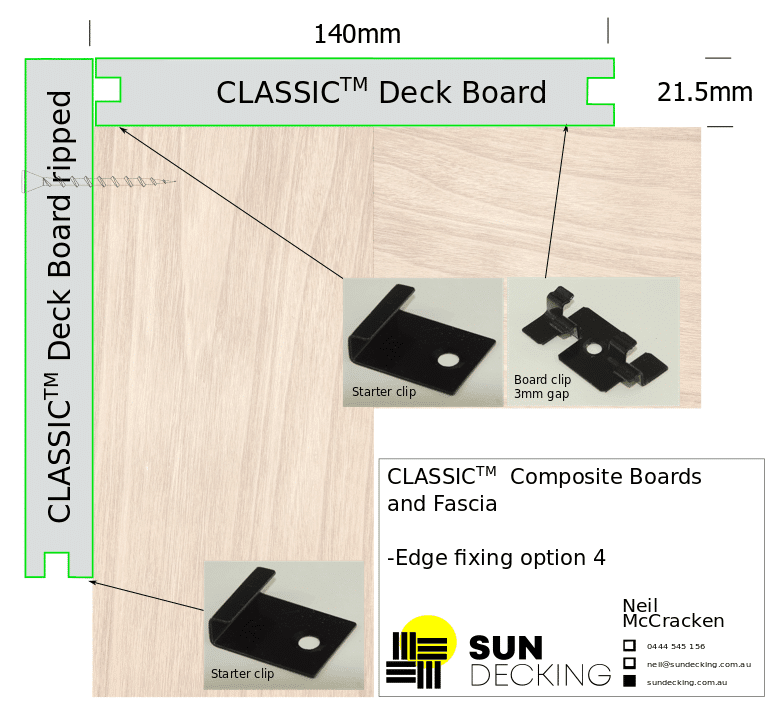
4. Edging the composite deck
One of the great aspects of composite decking installations is that there are many creative ways in which to install the boards to make a unique and personal style. Board colours can be matched for contrast, highlighting step down or edges, screening can be matched to decking and layouts can be personalised.
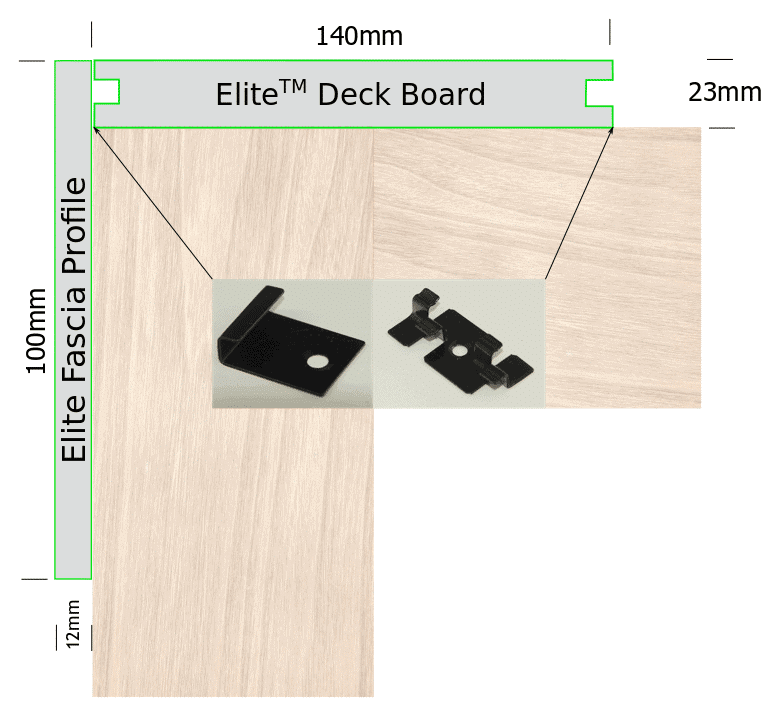
A key part of the finish is the edge of the deck and the vertical decorative faces. We have options available for ensuring you create the look that you want and stock fascia and edge boards for complementing your installation.
The most widely used options are created in the images over to the right and can be adapted for deck edges, step downs, stairs and muti level decks. We are happy to clarify with you the best options for your layout and design.
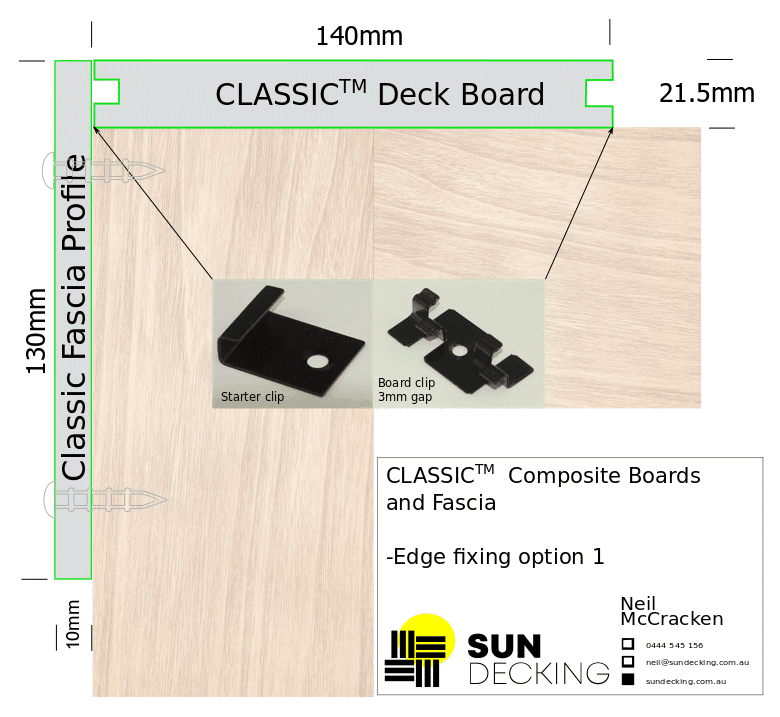
5. Fasteners, clips and securing the boards.
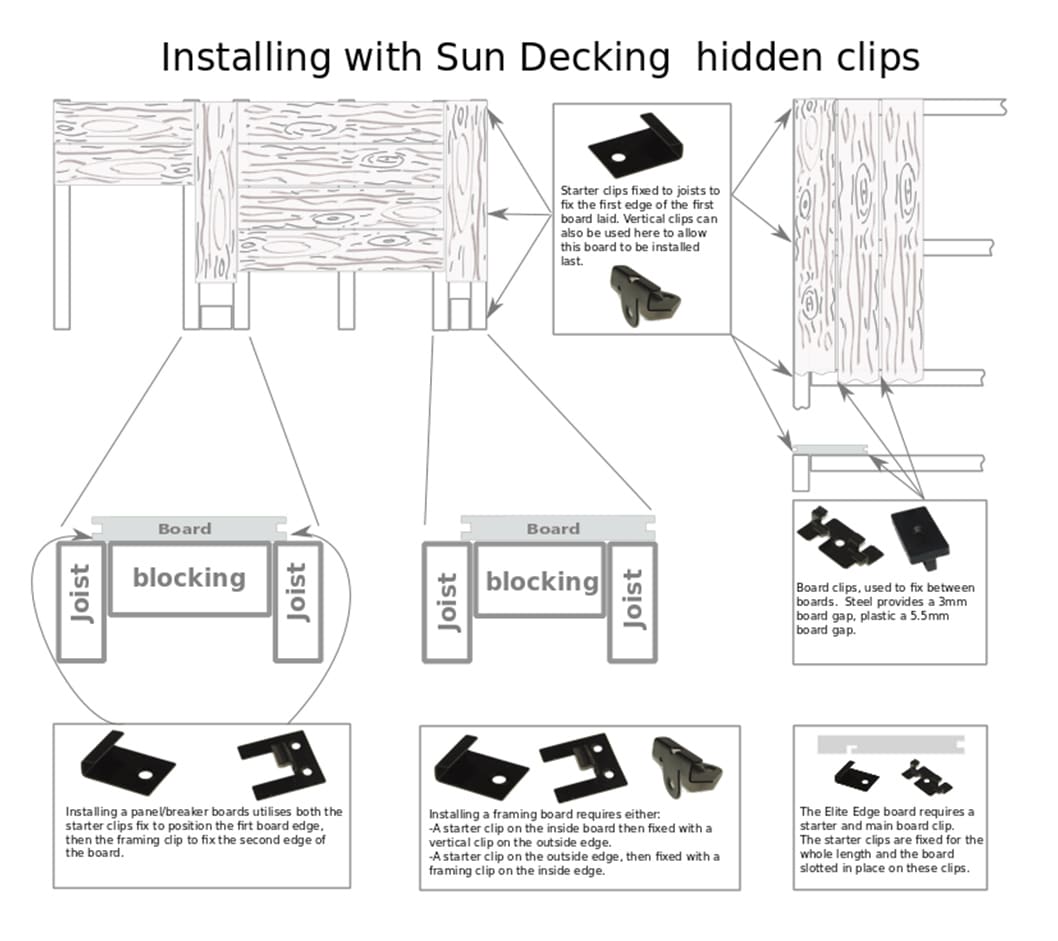
Sun Decking is designed for installation with a hidden clip system. This allows the installation without any direct fixing through the boards, so giving a clean, professional finish to the deck.
Our range of clips allows for installation of decking, picture framing, panel boards step downs and stairs. It is a simple and secure way to install the deck, allows boards to move in temperature changes and keeps the deck clean looking and safe for bare feet. Our clips are a coated 314 stainless steel, and our fixings are 304 stainless so you can be assured they are designed to last. Take the time to plan the installation to utilise the clips we have available.
Part 1: Click image to enlarge
Part 2: Click image to enlarge
Own a property on the Australian east coast and looking for quality, affordable composite decking?


